Friday, December 31, 2010

Do Not Miss: December 2010

3...
2...
1...
Happy new year everybody!!!!!!!!

I wish you all the best in this 2011, may all your wishes come true!

Meanwhile, check out what you should not have not missed this last December.

Wednesday, December 29, 2010

Some new changes to the blog

The new year is near, and I have made some changes before it comes. I've changed the style of the blog, and added some static pages, these are:

  • The Gallery: Links to all of my miniatures
  • WIPs: Links to all WIPs I have ongoing
  • The Library: Links to all my articles
  • Spare Parts Shop: A new section were I'll post all the spare stuff I don't want anymore which could be interesting to you.

I'm sure I'll be adding some more sections when the time comes. Anyway, I have (at last) final photos of the Last Stand of the Crimson Fists which I will be posting next week. Stay tuned!

Friday, December 10, 2010

WIP: High Elves Sea Guard part 3

WIP: High Elves Sea Guard part 2

With the elf prototype finished, I am now definitely sure about the colours I'll be using. Therefore, it's time to prime the rest of the elves. Here's a photo of some of them, where you can see the new method I'm using for handling the miniatures while painting: I use a little plastic rod attached with glue to one foot of the miniature. This comes in very handy, I can use some plasticin as a temporal base, like the one you see in the photo:


And now, the first part of the batch painting process I have carefully designed (to save time). I'll start by painting the gems. I'll use airbrush to make the painting faster and smoother. At first I thought I could paint the gems entirely with airbrush and just use the normal brush for the white reflection dots, however, as the gems are so little, I could only use the airbrush for base painting and then I had to work with the normal brush.

Remember that for each step, I will paint 9 elves at the same time. I put only a photo of one of them, but the rest have been treated the same way.

First, orange base airbrushed (Fiery Orange, Citadel) on the gems.


You can't really appreciate it in the photo, but in the second step I airbrushed some red (Napoleonic Red, Andrea Color) on the gems.


Then, airbrushed black (I think I used number 6 of Andrea Color's set of blacks, but any regular black does the trick):


As you can see, the last photo does not show a very important advancement in the painting, thats because of I what I said earlier about the gems being too small. So, a little bit of regular brush painting to finish up the gems:


Alright then, gems finished. Now I mask the gems to carry on painting another part.

I paint the clothes un Turquoise, right out of the pot, with the normal brush (I could airbrush, but in this particular case, it proved to be harder than just using a normal brush.


Now I mix some Space Wolves grey with the Turquoise, and airbrush the light parts of the clothes. It's quite difficult to see it in the photo, but look carefully.


Add some red, blue and Dark Green from Vallejo to the base Turquoise to make the shadow colour. Airbrush again.


With the basic light and shadows done, the work left on the clothes will be done with a normal brush. Therefore, I will mask the job already done and continue to another area to make good use of the airbrush.


Let's prime the shield back to white. Notice the gem in the middle was masked earlier, so when the airbrush job is finished, we'll retire the mask and find a perfectly finished gem!


WIP: High Elves Sea Guard part 4

Tuesday, November 30, 2010

Do Not Miss: November 2010

This is what you should have not missed this last November.
  • Crystal Brush 2011 announcement: November 2010 will be remembered as the month when the first edition of Crystal Brush was announced. This contest will for sure change fantasy painting worldwide. $10,000 for the winner!

  • Zorabeth Morning Star by Freeman: Amazing new piece by Joaquín Palacios (Freeman) for Andrea's Warlord Saga. At first I didn't like it very much, the horse seemed too brute for the lady, but then I saw this turnaround video and my opinion changed. I want this miniature!!.

  • The Legend of the Dark Forest by Mauganra: Another great use of the scared villager from GW's giant kit. Put it together with the very famous last minotaur sculpted by Allan Carrasco, paint both to the highest standard, and there you have it! A masterpiece!

  • Picster's Dark Eldar Jetbike: Simple and quick but effective painting. It reminds me of Tron, the helmet and the light effects are awesome, but also the weathering in the from part of the bike. Awesome. Makes me want to paint some of these.

  • Crusader from Mortimer (Nocturna Models): Take a close look at the face of this crusader. It's screaming for some superb paint jobs! I want to do something about it!

  • Riding the Storm by Joaquin Palacios: The newest pirate on the Pirates of the Caribbean range from Andrea Miniatures is this wonderfully sculpted captain designed by Freeman himself.

Tuesday, November 23, 2010

Preparing 2011

Come on guys! The year is ending and its time to think about where to go next. Here's a list of international events and the information we have now on them:

Crystal Brush 4-5-6 April, Chicago
GD France 22 May, Paris
GD Spain 3 July, ¿Madrid?
GD USA 30 July, ¿Baltimore?
World Expo 19-20-21 August, Montreux (Switzerland)
GD UK ¿18/25 September?, Birmingham
GD Australia 1 October, Sydney
GD Italy 17 October, ¿Modena?

With this said... where are you going?

Thursday, November 11, 2010

"V Open de Quimera" this Saturday


13 November was the date chosen for the "V Open de Quimera" contest which will take place in Madrid's wargaming store Quimera. Therefore, I wish to see you all this weekend were we will certainly be able to chat if you want to! I will be judging the contest, so bring any bribes you may think appropriate! ;)

See you guys there!

Thursday, November 4, 2010

WIP: High Elves Sea Guard part 2

WIP: High Elves Sea Guard part 1

Now let's start with the painting. I will be painting one prototype first, in which I will not hesitate to spend a long time. Once I finish this prototype I will have clear knowledge of what I want my elves to look like and the colours to use, so I will be a lot faster with the rest.

My first approach will be to get this shield concept on the actual models.


The star and the wings will certainly resemble the prince from Tribute to the Fallen. Check out the lion in the background!


In this step I will leave the shield as it is now. Probably later, once I have more of the elf painted, I will come back to improve it and change stuff to get a better match for the whole painting.


And now I'll go on with the clothes and the metallic parts. I will try to use airbrush as much as I can as it will ease the painting process and also make the transitions smoother. I also do not hesitate to use metallic paint with the airbrush, it actually works more or less the same as with the other non metallic paints. The shades in the metal will be green/blue representing the reflection of the greens/blues from the clothes in the shiny elvish armour.


In the next step I have the prototype nearly finished. I've chosen a reddish tone for the hair which will contrast with the turquoise of the rest (actually, this fact has given me the idea or making all of my elves red-headed, as some kind of specific race feature for my elves). The golden parts are painted using Gold colours from Citadel, shaded with greens and purples, while the edges have fine lines of Metallic Medium from Vallejo, to emphasize gold final glows.


I did some work on the shield again, as I said before. Mainly, improving the contrast and perfecting the work on the wing lines. Also, here's a start of the metallic work on the spears. Again, the use of airbrush is highly recommended. I used masking tape to cover the blade which I wasn't painting, and I was able to get very smooth transitions.


Stay tuned!

WIP: High Elves Sea Guard part 3

Sunday, October 31, 2010

Do Not Miss: October 2010

This post will open a new section in Volomir's Blog (as if latest activity weren't enough!). This section is called "Do Not Miss", and will gather every month links to the best stuff I've seen in the miniature world which you cannot miss. Starting this October, this is what you should have not missed this last month:

  • Great Mighty Gobbo by Kyril Kanaev. What an amazing creation by yellowone, I think this goblin is simply a piece of art, look at the amount of detail and the wonderful use of colour in this little piece.

  • The Great Wolve by Cristian Sánchez (Kai). The best work from Kai I've seen so far. Very much deserved Gold in Single 40k in UK this year. Pretty smooth! Who does not want to have something like this in their cabinet?

  • Alien Pile by sivousplay. I'm not a great fan of Alien but I have to say this piece is very very nice!

  • Alice & her collapsing Wonderland by Ernst Veingart & Ben Komets. What a great collaboration between these two. Tremendous idea and the quality of the modelling is very good. And Ben did a good job with the painting too! Anyway, if I have to remark something is the idea. It really knocks you out!

  • Scale75 Spartan by Paul Deheleanu. Check out the modelling process (in Spanish) of this 75mm figure from Scale75, a new miniature company from Spain. This spartan is one hell of a great figure! Great work from Paul.

  • Markos Botsaris (Alexander Miniatures) by Paul Deheleanu. One of the best historic pieces made lately. I'm sure this amazing miniature will give a lot to talk about.

  • Golden Demon UK 2010 Winners. Find all the winners in GW page, photos are not very good but at least you can see them!

  • Hunter or Hunted by Raffaele Picca. This is the entry which won the German Slayersword. Find some photos of the creation process in this link to Massive Voodoo. Congrats to Picster on his award, what an amazing piece! Check out the base creation process!

  • The spanish Space Wolves. Posted on the blog last week, you cannot miss the Space Wolves created by spanish painters last month!

  • Thor by Knightmodels. After the success of the first Thor version, Knightmodels has just released this new version. Check out the green, amazing!

  • Dr. Doom by Knightmodels. And check also the green for Dr. Doom, what an impressive amount of detail, the mask, wow!

  • Darth Vader by Knightmodels. In this version of Darth Vader, the cape alone is an artwork.

  • Fear by amon chakai. A nice diorama seen on GD Italy (Gold in Open), what a great idea!

  • Aerobase by Aliaume. I think everyone has had the same idea for a Valkyrie. This one is actually very well done. Gold in GD Germany 2010.

Wednesday, October 20, 2010

Space Wolves are the fashion in Spain

Seems like Space Wolves are quite trendy now in Spain, I can count at least three different Space Wolf wonders winning trophies from spanish painters in the Golden Demons celebrated last month.

My friend Arsies (Javier González) won Gold in this year's edition of Golden Demon Italy. I thought I had to dedicate a post to spanish Space Wolves because of this amazing Space Wolf Lord, it has really surprised me! Congratulations to Arsies on his award!


This is another one from my friend Kai (Cristian Sánchez), he also won Gold but in Golden Demon UK 2010 last month (you might have seen it already). For me, Kai's best miniature so far, and I'm sure one of the best awards he's managed to win. Total different style to that of Arsies but check it out! Breathtaking!


And yet another Space Wolf, from Iguazzu (Alex Varela), silver in GD Italy 2010 just behind Arsies:


Check his blog for photos of the Italian GD and figures presented there. Meanwhile, check this harlequin in 80 mm from Rusto:

Monday, October 18, 2010

GDs Italy and Germany 2010

So these were the spanish painters awarded this weekend:

GD Germany:

No demons for the spanish this time!! (I am a bit disappointed here... grrr)

GD Italy:

Arsies Gold in Single 40k
Iguazzu Silver in Single 40k
Iguazzy Silver in Monster 40k
Fstar Bronze in LOTR

Congratulations to all!

I'll post only pics of the Slayerswords, this one's from Raffaele Picca, from Massive Voodoo, German Slayersword 2010:


And this one's from Luciano Rossetto, winner of Italian Slayersword 2010:


Not the best photos, I know, but this is what we've got so far!

Friday, October 15, 2010

Two Golden Demons this weekend (Germany and Italy)


This weekend, two Golden Demon contests will be held at the same time in what it seems to me a total careless datepick decision from GW internationally. Some painters like to travel abroad to these events and placing both events the same day, considering that there are only 5 Golden Demons in Europe in a year, seems a bit foolish. There won't be any more Golden Demons in Europe until GD France which will presumably be held on April, as usual.

Anyway, we have two spanish groups travelling abroad this weekend.

Italy: the south mark! Arsies (Javier Gonzalez), Iguazzu (Alex Varela) and company
Germany: Fenix (Borja Garcia) and our friends from Valladolid

Good luck to all of you guys! We want to see pictures soon!

Wednesday, October 6, 2010

WIP: High Elves Sea Guard part 1

This is one of the projects I am working on. Due to the release of Warhammer: Island of Blood and the new range of high elves, I've decided to build a little army of these little flower eaters, around the hero that is the elf prince of Tribute to the Fallen. First step will be a unit of sea guard from Island of Blood which I present you right now:


I don't really like the seadragon relief on the shields.


That's why I will get rid of them with the use of my dremmel. I will also erase the reliefs on the banner, though I'm not sure if I will be using this one or building one of my own.


Now I fill the holes on the shields with some milliput and sand them after they are dry to smooth the surface.


I also don't like how big the armour scales are. I believe they could have modelled an additional row of scales between every two of them. So, that's what I'll do next.


Also, I'll be sculpting some reliefs of my own on the shields. I would prefer to use the plain shields for some complete freehand work, but as this will be an entire unit, reliefs will make work faster. I just modelled one and then made a little green stuff press mould to repeat the relief in the rest of the shields. Now they will have a symbol to relate them to my Tribute to the Fallen prince!


Now that everything is finished, I will wash the pieces with some water and soap, to get rid of possible mould grease and putty dust. See them dry on my bath towel!


Stay tuned!

WIP: High Elves Sea Guard part 2

Monday, September 27, 2010

Games Day UK 2010 News

Apart from the Golden Demon contest which is what I'm really interested in, yesterday at GD UK 2010 there was a lot of new stuff unveiled from what GW will be releasing soon. I think this time there are a lot of remarkable new miniatures and I wanted to mention them in my blog. If you haven't heard yet, take a look at this link where you will find pictures of all the new things GW has prepared for us:

Bell of Lost Souls post on GD UK 2010

In my opinion, the most interesting of all the releases is the creation of Warhammer Forge, some sort of new Forgeworld range but focused only on Warhammer Fantasy. This is something I wanted to see a long time ago, and I hope to see at least the same amazing stuff for Fantasy as the one seen for 40k in Forgeworld. Maybe Chaos Dwarfs isn't the best of beginnings for the new range but it's certainly good news for Old School lovers. And I have to say, I really like the new Dark Eldar range!

Sunday, September 26, 2010

Golden Demon UK 2010 First News

Incoming sms from David Rodríguez aka Karaikal:

David Rodríguez (Karaikal):
Gold in Single Fantasy
Bronze in Single 40k

Cristian Sánchez (Kai)
:
Gold in Single 40k

Considering these were the 3 entries from our Spanish representation, I have to say quite impressive! Congratulations my friends!

Slayersword went to Matt Parkes. Can't wait to see pictures!

Thursday, September 23, 2010

Ork Nob Step by Step

I took many pictures during the Ork Nob creation process. This article will tell you in detail every step carried out to create this figure.

First, I took several pieces of 40k Ork at hand, and began to investigate as if it were a puzzle to come up with something that would convince me. This is the first version I composed (completely different from what it turned out at the end, but you need to see this step to understand the whole process).


After this first version, I talked a lot with my colleagues on how to improve it. After a productive afternoon of painting in our personal painting temple in Madrid (TWT) and a night at my good friend Elias Alonso’s, this was the result:


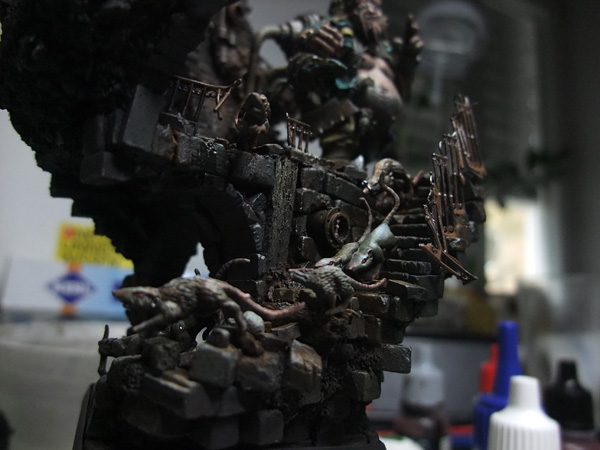
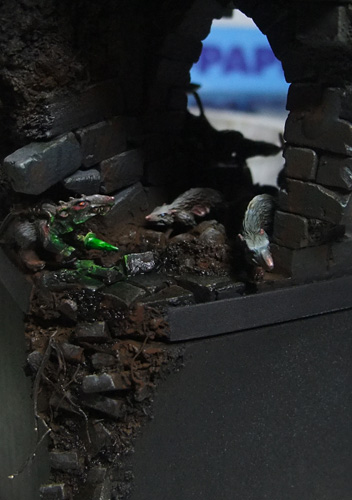
Once I cleared out the pose, the front view convinced me greatly. I made the base with varied pieces of plaster as ruins:


At this point I undercoated the figure, without gluing the arm with the axe, the head nor the banner:


And here I started to paint. I used a basic mixture of Scorpion Green (GW) and Chocolate Brown (Vallejo) lighted up with Ice Yellow (Vallejo), and introducing some Clear Sand (Vallejo), shadowed with Oxford Blue and Brown (Vallejo).


Then I got to the pants. I used a mixture of English Uniform (Vallejo) with some Yellow Green (Vallejo) or Scorpion Green, lighted up with Ice Yellow and shadowed with Oxford Blue and some red more pronounced in the deepest shadows. The truth is that I was not happy with the colour and I finally started to use tones of other colours and it changed a lot. In any case this was the first approach:


As you can see in the pictures above and also in these which I put now, I decided to remove the covers of the holsters that come with the standard because it made it even bigger, and partially blocked the leather pants which did not want to lose. Also, the covers did not convince me too much. I made this homemade solution with a brass tube, cutting the banner with the Dremmel and sanding the end of the joint for the banner to fit inside the tube.


The one reason why I finally decided to remove the holsters was the leather jacket back where I wanted to paint some good leather. I started with Chocolate brown, English Uniform and Bestial Brown (GW) with Ice Yellow for the lights shadowed down to almost pure black:


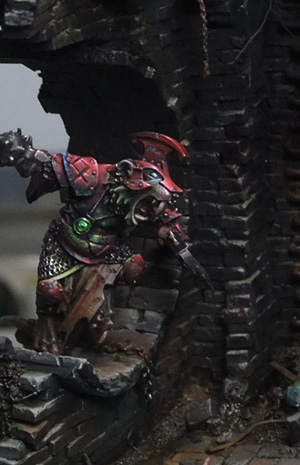
I had already decided to use yellow for the armour plates and I knew it was going to distract attention from a much more important detail: the face. Thus, making use of red, I devised a composition in a cross shape around the face to frame it. Therefore the red, apart from distracting from the yellow, directs the viewer to the face. You will see in the end that these points are the only reds in the figure. I took a picture of the Ork and marked with crosses the points where the reds would be placed. In the banner and the weapons and it was clear that I would use bloodstains. On the floor it was not so clear, so I decided to introduce a Cadian helmet. At first I thought I'd paint it any colour and then introduce blood as well but I thought it would be too much gore for the miniature and that bloodstains would seem too strategically placed, too unnatural. So I chose to paint the helmet in red. The following is the photo in which I make the composition study:


And from another angle:


Once it became clear to me, I began to paint the other arm:


In these pictures it seems a little dirty but I would clean it later.


Here's how I made the shoulder pads. Following a tutorial by Allan Carrasco, I used a base coat of Sunburst Yellow (GW), and while each layer was drying (a yellow base is hard to paint, you have to give several coats to cover well) I painted in black the chest areas which were to be painted in metal:


Over the base layer we paint lights and shadows. I did the opposite of what should be done and I skipped this step. I did it afterwards, but it would have been desirable to do so now.

Then I did some Ork style freehands, which are not complicated at all. First I defined more or less the shape (it's a very simple one which makes the job easier):


As it convinces me, I fill the picture completely. If I were not convinced, since the initial shape is very light, I can erase it by painting over the basic tone of the pad and then change it later:


I paint the other pad with the same process:


Then I give lights and shadows to the whole set of shoulder pads and freehands. Therefore we blend the drawings with the shoulder pads and everything looks more integrated with the dirt and wear of the set. I insist that I did this after I made the paint chips, but it is advisable to follow the steps I said.

Now we proceed with the chipping. I followed again the tutorial by Allan Carrasco, very simple. We take Boltgun Metal (GW) and with a fine brush (I used Windwor & Newton 00) we mark the metal peeled areas. It is important to note that they have to be random, putting more chips around the edges, where it makes sense that the material has weared more. It is also useful to bring out bigger chipped areas as if they had jumped because of a blow or an impact and other areas with virtually no chipping.
Then you have to paint the lights and shadows of the chipped paint. We will simulate the paint discontinuity when the paint has been stripped off. To do this, you have to paint the lights in the areas that face light and mark the shadow mark on the lower parts of the color changes, where the shadow would really appear, to get real look of peeled paint. I’ll show you an outline of what I want to explain:

First base and chips:


After the lights and shadows of chipping:


And then a touch of Mithril Silver in areas where there is more metal to give more realism:


That's how the figure looks like:


After that, I used glazes of red and brown for the chest plates to improve their appearance. This was not very important because the face will cover them almost entirely.


After I started with the leathers, with Brown Chocolate, English Uniform, Reddish Brown (Andrea)... I basicly made a brown palette with all I had at hand.


Meanwhile I painted the weapons in black. Here I also painted the metal plate in his hand, and the boots. The metals are fairly easy and grateful to paint. The base layer is Boltgun Metal, lighted up with Mithril Silver and final lights with Metallic Medium (Vallejo). I made the shadows with matte colours, mostly yellow and brown as the ones I had used in the rest of the miniature to maintain some consistency.


Here I begin to paint the face. From the first images to how it turned out in the end there is quite a distance, which is interesting to see how the figure evolves and how important the finishing touches are. First, basic lights and shadows for the face using the same skin tones lighted with Ice Yellow. For the mouth I used pinkish colours like the ones for the lip. The teeth are just a base coat of English Uniform with Ice Yellow. I should have used Bleached Bone (GW) but I hadn’t got any so I created it by mixing other colours.


Principio del formulario

Escribe texto o la dirección de un sitio web o traduce un documento.
Cancelar
Escuchar
Final del formulario
In the next step paint the left arm axe completely. The lifted axe has Boltgun Metal base layer. The axe is simply a metal job, always pushing lights to Mithril and Metallic Medium in the end. In addition, I experimented with different colours for the shadows and oxides without a specific recipe. It is simply a matter of playing with colours and trying. I also tried not to let everything in silver and in some areas I used Tin Bitz (GW) as a base, mixing it with Boltgun Metal or Mithril. In these steps I also used some strange oxides with turquoise but then took them out because they combined badly with the green skin, so I finally opted for more conventional orange ochres. I respected the palette of yellows and browns used in the pads to give homogeneity.
As for the face, I defined the mouth darkening with dark browns, I painted the teeth and lips with a pink that is made from Magenta (Vallejo). Then there are some early skin tones with different reds and blues taken from what I had in the palette, not too complicated. If you stick to a few colours you'll achieve greater colour harmony and atmosphere without even noticing.


Then I placed the banner with his fist already painted. The process is the same as what I did with the shoulder pads. I also started painting the raised axe. The quality of that piece is much lower than the other arm, because it's from a plastic Ork and in this case it makes a great difference in all aspects, especially when painting. It costed me a lot of effort and the result is much worse. As the axe was big and I did not want to leave too much metal together, I decided that some areas were also going to be painted in the scratched yellow from the pads and the banner. That would give more harmony beacuse the yellow would be distributed more over all the miniature. What worried me initially was that the yellow was highly dispersed at the top of the miniature, and ate the other colours by catching all the viewer’s attention. I had in mind to solve this with the bloodstains that I explained above and as you will see the end, that’s what I did.
I also tried some kind of red light effect on the cross of the bionic eye but that did not convince me. I also worked the metals in the top of the banner with glazes of red, Scab Red (GW) and the like, to give a bit of intensity to the figure.


Since the contest in which I would enter the figure (Golden Demon Spain 2008) was very close I could not take pictures of the process so often and I have got only the ones just before leaving for Barcelona.

In this next step I did the blood stains (discussed in the photo of the red crosses composition) and painted the base. Blood stains are simply a game of dotting and making stripes more or less studied with many types of red. You have to play with the brightness and gloss of paints and varnishes, ensuring that the inside of the stains keeps a much darker red, black in some parts to make it a bit more gore.
The base is also a fun part of painting. First I painted all in a brown tone with acrylics and then with oils, staining and staining until I liked the result. It is a very fun game that I recommend. It does not have a specific recipe, the only secret is to try colours, doing and re-doing until one is satisfied with the result.
As I said, the part of the composition cross which was on the base, instead of putting blood I thought it was best to put a Cadian helmet painted in red not to fill all with blood.
And that's how I left the miniature before travelling. There are things unfinished, such as the raised hand axe and the hair tufts of the banner, which are based simply on base colour.


Just before travelling and since I had been going over the idea along the whole process, I decided to destroy the bionic eye and put a lens. I think it was a very wise decision if somewhat risky for the time I did it. It was not very difficult but dangerous, all I did was put a ball of putty covering the cross and then paint it. At first I thought to use Dremmel to the cross but I'm glad I didn’t because the risk was too great. Who knows what could have happened...

Already in Barcelona and with the help of my great master Banshee, I finished all the things remaining. These were the tufts and the hand basically, and from there we made the famous final touches which are what give a miniature the quality raise. Mainly this consisted of contrasting the points of light in the face, giving gloss to the lip, improving blood stains by giving a touch of magenta and black inks, repainting some areas of the leathers that were pretty bad, painting some skin cuts, changing the colour to the eyecup, mouth shaping contrasting with very dark colours ... I listed about 20 things to finish off the figure and right now I do not remember them all, but the truth is that I painted and painted until I fell asleep.

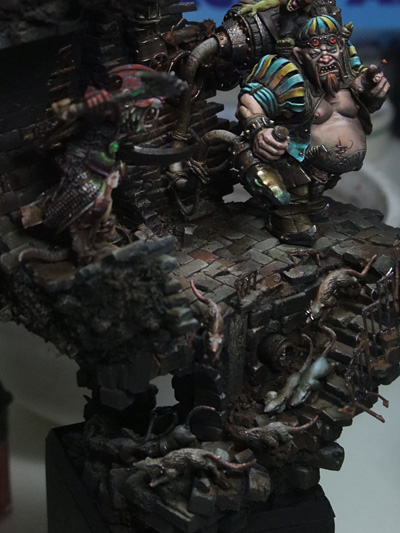
And this is the final result that you have already seen!